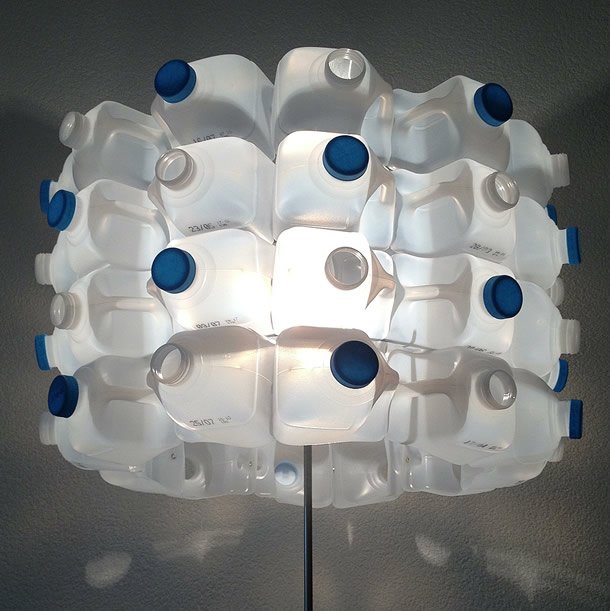
Here’s another DIY lampshade I’m adding to the other upcycle design lampshades I made. Again it’s a design that uses discarded plastic milk cartons. After making some upcycle lampshades using the side parts of the milk cartons, all the top parts where left. So I had to do something with them, just like the bottom part [see the next DIY lampshade]. So after some trial and error I came to this lampshade I call ‘MilkWheel’. It’s a lampshade that can be used as a pendant or floorlamp.
The fun part is that you can use the caps to screw them back on and give the design your own touch. There are lots of variations to be made!


Photos © Gilbert de Rooij
After cuttting out pieces I started joining them by using an ‘Eyelet Crimping and Hole Punch Function Pliers‘ and eyelets. This way I was able to create rows of top pieces. You can make these rows as long as you want. The result has to fit the lamp frame. In the end I combined all the rows into one drum like shape. The final step was to attach the lamp frame inside the drum. And that’s it.
Well all in all it’s, just like the other DIY lampshades, a reasonable easy lampshade to make. It just takes quite some time!
What you’ll need:
- 48 [+ 1 spare] Plastic milk cartons
- Small snap-off blade knife
- Scissors
- Eyelet Crimping and Hole Punch Function Pliers with eyelets
- Lamp frame [in this case 40 cm. diameter]
- Tie-wraps, 20 cm. / ± 3 mm.
Please share your result and/or findings with me.
Have fun!











I love it Gilbert. What do you use to cut the plastic so straight?
I have a bunch of plastic containers waiting to be used as concrete molds for my lamps, might as well try this…I don’t know if the US is ready for this though…
Hi Jay,
Thanks for your compliment.
See the tutorial on how to cut it. I used a template made from a part of the carton and took a snap-off blade knife and scissors.
Looking forward to your version. Success!